
Table of Contents
Your eLearning course often involves brainstorming every detail and piece of content you want to include, presenting and arranging your learning material (docs, videos, worksheets, etc.) in a specific sequence. But this is quite a challenging and time-consuming process, right?
This is where a storyboard can come in very handy. Storyboarding is a technique to draft modules, arrange eLearning content, and create online courses with ease and minimal effort. Using visual storyboards facilitates course design and the content development process.
Table of contents
What is an eLearning Storyboard?
A storyboard is a sequence of panels in which an instructional designer lays out the framework of their course:
Generally, a storyboard should specify the visual elements of every screen in an online course (text elements, audio elements, interactions, and branching – where the system or user will go next). The best approach is to leave as little to the imagination as possible and have a detailed picture of the final product.
So, eLearning storyboards are detailed maps that represent course content and give an overview of the “story” someone tells. When you see your course’s “storyline” mapped out, you’re more in control of the design process: you’re better able to put each component in the right place and create a practical course.
Why You Should Start Storyboarding
eLearning design isn’t a walk in the park. Getting sucked into a minefield of structural issues while writing your course is easy. Your units don’t transition well; you keep forgetting what is supposed to link where, and you find yourself spending a lot of time trying to edit disorganized eLearning content within your eLearning authoring tool or course platform.
Also, keep in mind that a course outline is not a placeholder for a storyboard. Instructional design storyboards are designed to elaborately flesh out your course from start to finish, including all the technical details you’re most likely to overlook among the chaos of an eLearning project.
So, imagine what a life-saver an effective storyboard would be!
Following, we’ll explore nine key areas where storyboards are helpful.
1Determine if the course’s concept works
A storyboard helps you validate whether the main idea is working and determine the direction the online course will take. Also, during the storyboarding phase, you’ll identify errors related to narration, media, and other similar details. Detecting these mistakes early on saves a lot of effort and cost that could disrupt the implementation phase.
2Make use of the necessary media
Getting the most relevant and appropriate pictures/videos into the course is essential. Are the media complementing the text content well? Will they help learners achieve the learning objectives? During the storyboarding, you can better understand what the course will look like and assess whether the media adequately supports the key course ideas.
3Control the learning experience you provide
Course storyboards serve as the blueprint of how you have envisioned each section screen by screen. They contain detailed information about which visual elements will be used, which elements will be clickable, and more. Storyboards give you a concrete idea of how the course flows and how learners will navigate through it.
4Estimate your course budget
A storyboard helps you understand what the final product will look like and what you need to invest in to get there. How many pictures or other media do you have to buy? How many videos should you produce? Will you need to hire a graphic designer or voice-over actors? You can then inform all stakeholders and decide together about the final budget and how you’ll proceed.
5Put learning first and visuals second
The design is nothing without meeting effective learning objectives. Storyboarding helps ensure content focuses on your set objectives before any cutting-edge art or character design takes over the production schedule. Storyboards in eLearning help put the learning experience first and visual design second.
6Easily update your course at a later time
So, you’ve deployed your course, and learners are joining and completing their learning. A few months down the line, did you know that a storyboard can help you update the course? Simply pick up the latest version of the storyboard, see where you need to make changes, and update the course without errors and version issues.
7Align with your collaborators
Using course storyboards allows you to work towards meeting the same goals with the co-instructors, Subject Matter Experts (SMEs), and other team members. You will all have a clearer picture of what the course will contain before you actually start working on it. You can agree upon any changes you want to make before the development phase!
8Sell the course more effectively to potential customers
It is advisable to share your eLearning storyboard while selling your course. Your target audience will see precisely how an eLearning developer will present the course material and whether primary learning objectives are being met through the outlined learning activities.
9Save time, money, and effort
Creating a storyboard may take some time, but what about reiterations? Or confusion among collaborators?
Creating a storyboard actually saves you a tremendous amount of time, unnecessary back-and-forths among team members, and costly do-overs. Eventually, the project is delivered faster and at a reduced cost due to the time saved and the use of essential-only learning content.
How to Create a Storyboard
No two storyboards are alike. You can create simple image blocks or detailed spreadsheets depending on how detailed you want your course storyboard to be.
Some prefer to use Microsoft Word templates so that it’s easy to add new pages to the course skeleton and make quick edits to previously created thumbnails.
Others create visualized storyboards with PowerPoint or other software, complete with page mockups and detailed descriptions of every element. Ultimately, you can create what best suits your needs and preferences. It’s all up to you!
What should be included in a storyboard
Let’s dive a little deeper into what a storyboard (text-based or visual) should include to reach its maximum functionality:
The Main Component of a Storyboard
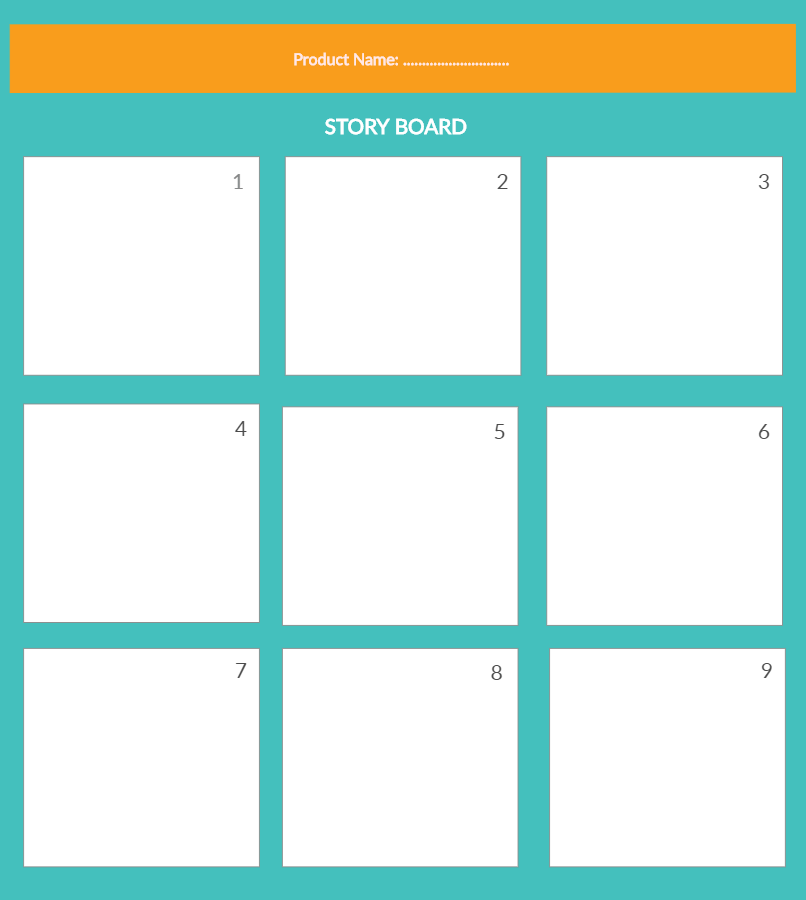
The main component of an eLearning storyboard is thumbnails. Thumbnails are blank squares where you can illustrate the images that represent your story.
Thumbnails should be numbered and have space underneath to include details. You can add space for any critical steps you may want to include. Many sites on the internet allow the creation of mockups and visual maps, and you can use any of them to create your storyboards.
Here are two examples of thumbnails:

You can find eLearning storyboard templates below:
In each of these free storyboard templates, there are thumbnails or particular areas where you can map out how your idea looks visually. It doesn’t have to be highly detailed, but it should give an overall sense of everything happening. Even if you don’t know yet what picture to use, try to draw one.
If you find it challenging to explain the action, break that scene into 2 or 3 separate ones. Also, we recommended that you write your notes before you draw the pictures so that you are determined about the flow of your text content.
Each of the above content storyboard templates is called a frame, slide, or page on a storyboard. You can use the template you prefer several times to create the flow of your final story.
The 5 Most Important Characteristics Of Storyboards
Every instructional design storyboard must have five characteristics: targeting, visualization, flexibility, reusability, and balance.
Targeting
It’s easy to get off track of the course’s original intention when designing a storyboard. Remaining focused on your initial goals and objectives is vital for you and your team.
Visualization
You need some way to draw or import a graphic into a storyboard frame. This will help you with the mapping of your course. The same as you’d use a vision board for project management!
Flexibility
Don’t choose a very fixed format of frames in a template (like six storyboards per page). Significant changes may be challenging, for example, if you want to drag frames to a new position.
Reusability
Designing something that can be repurposed for other uses is a compelling concept. The benefit is that you save time, and your design is consistent. Make sure to include pictures and notes that can be reused in your next course creation.
Balance
Don’t leave out too many details, so no one can tell what’s happening. On the other hand, don’t put in so much detail that it’s confusing. Tell just enough to ensure your audience follows the action and understands your intention.
We recommend showing your eLearning storyboards to people who don’t know the story or the lesson and working to fix things that confuse them.
How To Design Storyboard Slides
This is not a time to cut corners. Be ready to dig in, flesh out every detail, and check all the frames.
Step 1
Sketch the module flow and the structure on a piece of paper before proceeding with the actual storyboard development. After that, it’s time to create a mind map on paper or through an app.
For example, we used the Popplet tool to create a concept map of one of our courses hosted at our LearnWorlds Academy:
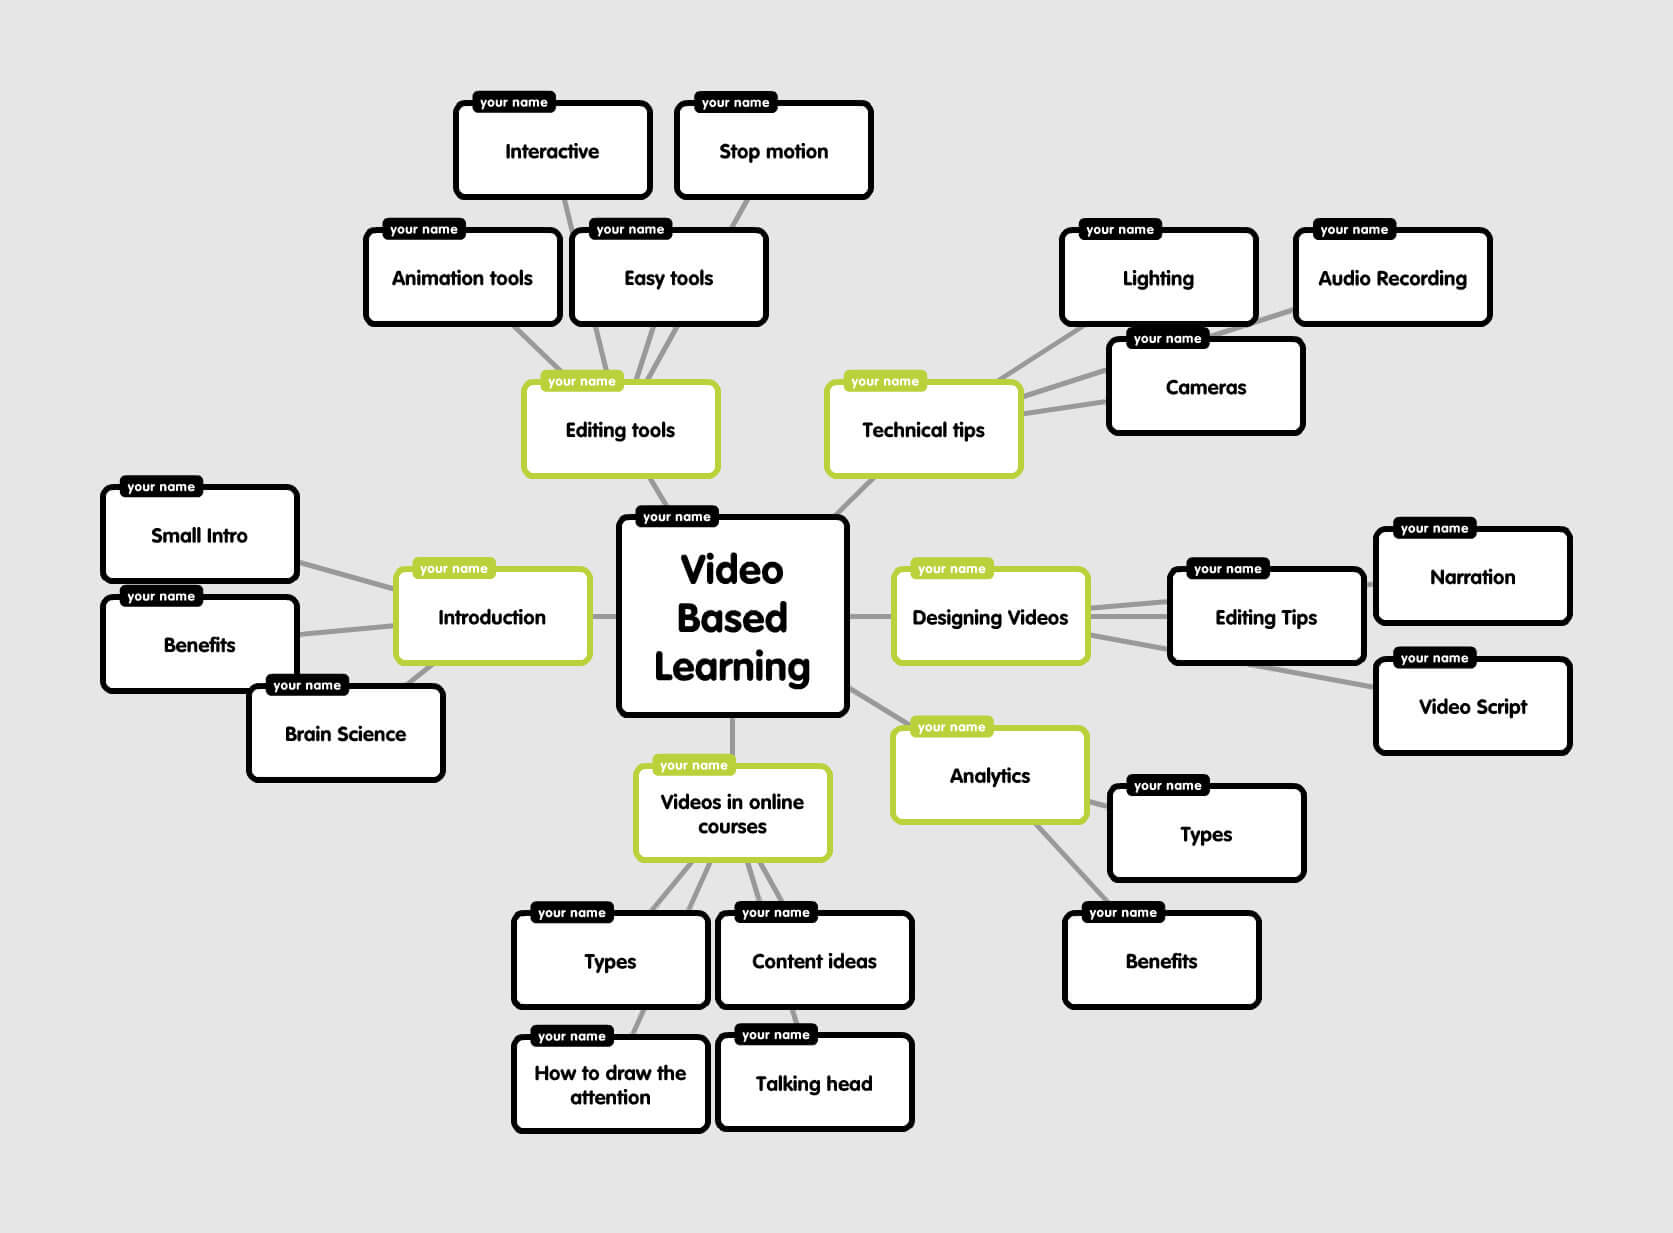
Map out the main concepts of your course (see green boxes in the picture) and then expand your ideas to other related concepts that will provide you with the course’s subunits.
Remember that this is not an analytical guide on designing an online course but an example of how to start designing your course storyboard.
Step 2
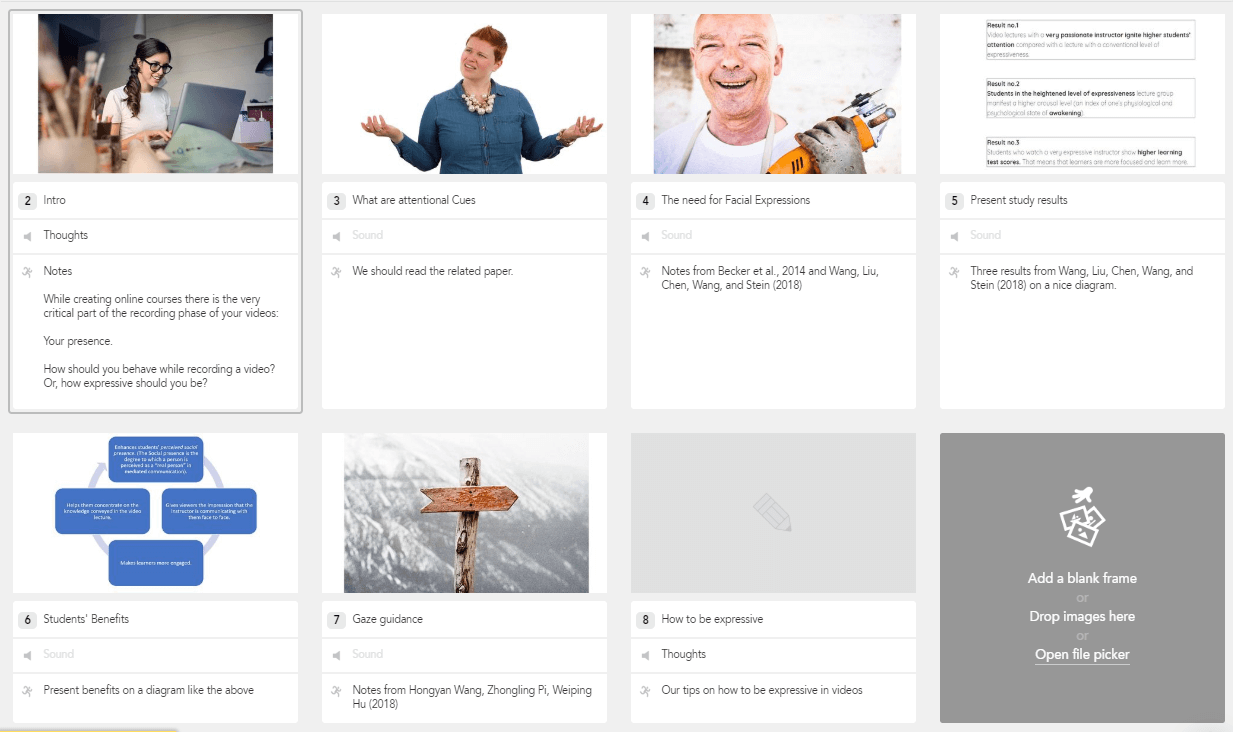
Pick the tool you will use for creating storyboards. Start the storyboard in the authoring tool. We used the tool Boords to map out each section’s contents. For example, we created this flowchart for the unit “Videos in online courses”:
As the work expanded, unit titles became even better and more precise, and new unit ideas emerged.
For example, a downloadable file would be necessary, as well as a quiz and a personal challenge students would take. We had to rearrange frames and add audio recordings with plain thoughts about what would be included.
After deciding the content of each section, we had a clearer picture of our activities. We could see if there were enough challenging unit blocks students would love and units they would really benefit from.
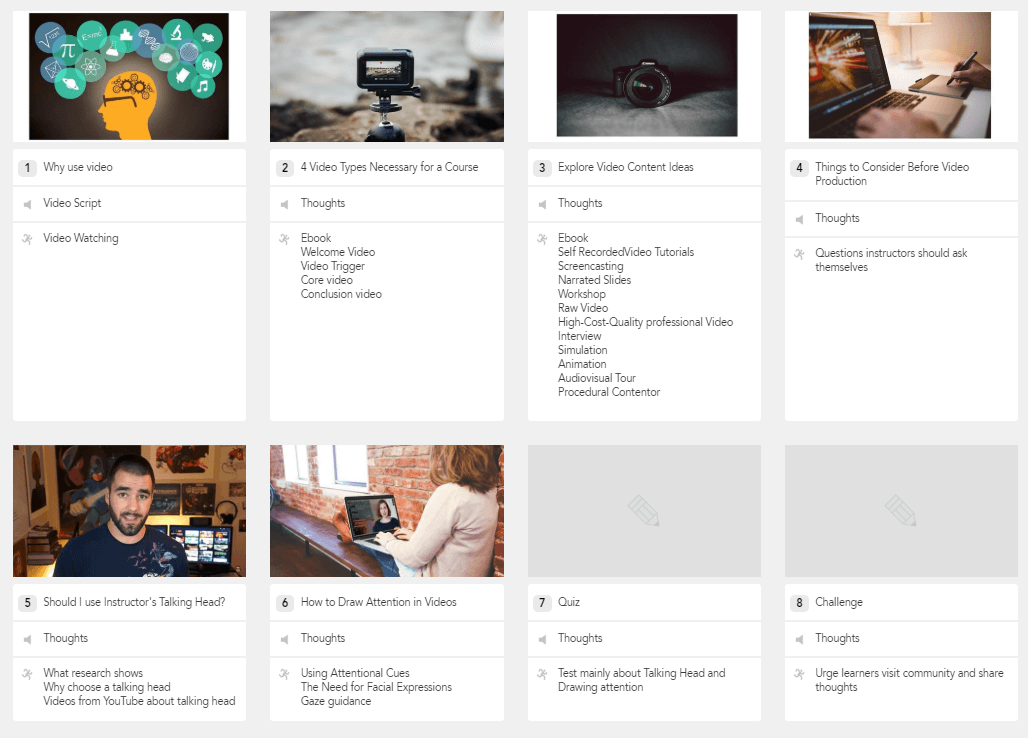
Then, it was time to describe each one’s structure and every course unit. Take, for example, “How to Draw Attention in Videos”:
Each frame represents a different concept analyzed in the ebook/unit.
Step 3
Now that you have all the details about your content, you can evaluate your content from a different perspective. Add the interactions you would like to include in the unit or other instructions students will see, like extra information, jumps to different segments of the course, or internal cross-referencing.
Decide how your different slides link together. Is this unit a prerequisite for the next unit? Is it navigation free? Can learners jump ahead, or will the navigation button only appear after they’ve answered a micro test? Write that down on each frame too.
Step 4
For assessment activities, you need to know their content and how your course should respond and proceed based on the learner’s response.
Step 5
After you’ve finished drafting your storyboard, it’s wise to look at it with a critical eye. Lay out the frames in order and try following the story they tell. Is all information delivered in a logical order? Are your notes clear enough to build a complete course using your storyboard for reference a week later? Have you touched upon all critical areas? Is there a variety of activities that keep students engaged?
Storyboards rarely turn out perfect on the first attempt. Just keep fine-tuning your storyboard until you are happy with the end result.
While the storyboarding process can be extensive, it will also illuminate potential problems with your course, saving you precious time in the long run.
Choosing the Right Learning Activities
There is a specific order in which learners process information in a course. Bloom’s taxonomy helps us understand this natural order. What Bloom did is describe the levels of student learning that could help a designer set the right objectives:
For each learning stage, there are specific multimedia you can use. The following table depicts everything we are talking about.
| Domains | Sample activities |
|---|---|
| Students can recall information Students understand your information better |
When they: – Watch multimedia Presentations (a video documentary, software demonstration, etc.). – Watch stock photos and graphics – Listen to audio narration. – Interact with graphics (images with hotspots, timelines with buttons that populate information, e.g., H5P activities). – Do Knowledge Checks. Multiple choice, multiple select, matching, true/false, and drag and drop. |
| Students can apply your information Students can analyze your content |
When you give them: – Try-It activities (The learner is presented with a screen capture with “try-it” prompts, interactions, and feedback). – Case Studies. (The learner reads a case study and answers multiple-choice questions requiring analytical thinking). – Branching Scenarios (The learner is presented with a scenario and answers a series of questions about how to solve it). – Hotspot Examinations (The learner clicks a hotspot on a photo or graphic and identifies what is wrong or right). |
| Students can combine and compose (synthesize) information Students can evaluate and judge situations |
When you give them: – Drag And Drop activities. Drag and drop text or images into categories or into a ranking order. – Whiteboard activities. Allow learners to design/draw a concept or process map on a whiteboard. Then, have them compare it with a simple concept or process map. – Discussions. Have learners discuss a question you make in the course community and let them show their expertise. |
Source: Spice up your Storyboard
The Best Tools to Create Storyboards
Below, we’re sharing the best tools we’ve tried ourselves in eLearning course design.
Boords
With Boords, you can quickly assemble storyboards, re-arrange frames, and create new versions in a snap. The platform features an extensive royalty-free stock image library so you can tell your story effectively, regardless of your drawing ability. It also provides a unique Animatic Tool.
Also, Boords fosters collaboration with teammates and clients in real time.
Storyboard that
StoryboardThat is a platform with an extensive image library, animated characters, and scenes from antiquity to the space age – all customizable. You can upload your material or use ready images and flexible layouts. The experience is intuitive and straightforward – with a drag-and-drop interface, you can create a storyboard in minutes!
Captivate
Captivate is a software where you can refine your ideas as quickly as you capture them. You can use simple gestures to add objects such as shapes, text boxes, images, and more. You can customize the look and feel of your slides by applying colors or images as slide backgrounds. You can also add hotspots to your slides and flesh out full conditional branching flow within your storyboard.
Plus, you can do a collaborative review and share your storyboards with anyone. Reviewers can post their comments for you to view in real-time and don’t even need to be an Adobe Captivate member.
Canva
Canva is a powerful tool for anybody who wants to create graphics in seconds. Canva’s drag-and-drop feature helps users design consistently stunning presentations, social media graphics, and more.
You can use different font combinations, image filters, and beautiful layouts to create a series of frames for your course. Note that you can also find millions of pictures and visual elements.
Popplet
Popplet is a more education-centric tool and is excellent if you want to create mind maps quickly. It is one of the best tools for capturing and organizινγ ideas. You can use it on the go to brainstorm, generate ideas, jot down notes, and plan projects.
With Popplet, you can easily create maps around concepts and expand your ideas, as we showed earlier.
MindNode
Another excellent mind-mapping tool is Mindnode for Mac and iOS. MindNode makes it easy to get a loose collection of thoughts into one document. MindNode’s Smart Layout makes your drafts readable and beautiful.
When your thoughts are on fire, you want to get them out and onto the page as quickly as possible. Quick Entry makes adding different ideas easy and intuitive. And what’s more, you can add multiple types of content like words, images, links, tasks, or extensive notes.
Evernote
Evernote allows you to create a journal of your notes. This app helps you quickly digitize your thoughts. You can upload any form of content you like (notes, files, photos, and voice memos), clip anything from the web, and access those files from anywhere.
Moreover, this app allows you to share information quickly and securely and also keeps your data protected and private.
Storyboarding 101: Complete!
Congratulations! You just made it through a pretty thorough introduction to storyboarding. But it was worth discovering the benefits of storyboarding and how it works because, as you can see, it can help you put our course in order and speed up and streamline your eLearning project.
If you’re ready to build your first course or just want to play around a bit to see if course creation suits you, take LearnWorlds for a spin, free for 30 days, no credit card required!
Further reading you might find interesting:
FAQs
What is the purpose of a storyboard?
The storyboard primarily serves as a way to map out a course and decide on which type of content to use and in which sequence.
Are storyboards important for online courses?
Yes, storyboards are vital for online courses. They not only facilitate the course creator’s work but also help prevent costly mistakes and omissions and ensure the course provides a smooth learning experience.
What are the different types of storyboards?
There are two types of storyboards:
What are the benefits of storyboards?
The key benefits of storyboards are the following:

Androniki Koumadoraki
Androniki is a Content Writer at LearnWorlds sharing Instructional Design and marketing tips. With solid experience in B2B writing and technical translation, she is passionate about learning and spreading knowledge. She is also an aspiring yogi, a book nerd, and a talented transponster.